Rainwater Harvesting System Maintenance
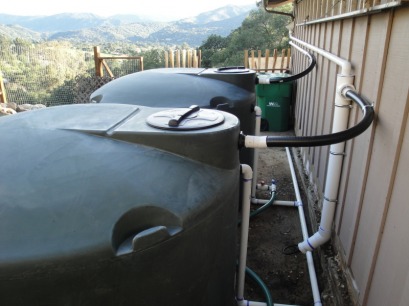
A rainwater harvesting system has many components. Some of these require ongoing maintenance and others don't. This page is dedicated to defining those components that require maintenance and how to perform the service. Although the maintenance requirements are not that significant, doing them regularly will help provide you with the highest quality rainwater your system can provide.
Maintaining the Leaf Eater
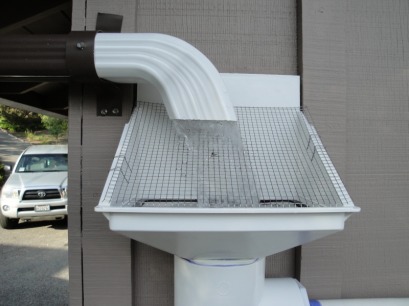
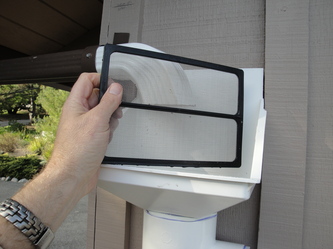
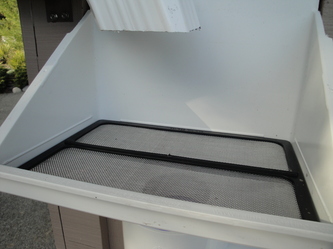
The Leaf Eater is a key component. Unless you have gutter filters installed the Leaf Eater is generally the first device that receives water directly from your gutter. The purpose of the Leaf Eater is to screen out debris. A Leaf Eater has two screens. The first screen is to divert large leafy debris, and the second screen which is much finer doesn't allow smaller debris to get through and into your system. Minute particles can still flow through the fine screen on the Leaf Eater and should be caught in the First Flush mechanism which we will discuss in the next section. Cleaning the Leaf Eater is fairly simple and doesn't require any tools. There are two clips, one on each side of the top screen. They pop off by hand and the top screen can be removed. Generally shaking it will remove any debris that might be stuck to it, but using a high power sprayer will clean debris off as well. The finer screen that sits down level inside the Leaf Eater can now be removed by hand and it usually works best to shake it off and spray it off with water from a high pressure hose. That is it! Set the fine screen back in place and the use the clips to anchor the first screen. This should take approximately 5 minutes at most. If you don't clean these out, debris will accumulate over time and break down and enter your system. It is important to spend a few minutes to check the Leaf Eater after each storm and remove debris to maximize rainwater quality entering your system.
Maintaining the First Flush Device
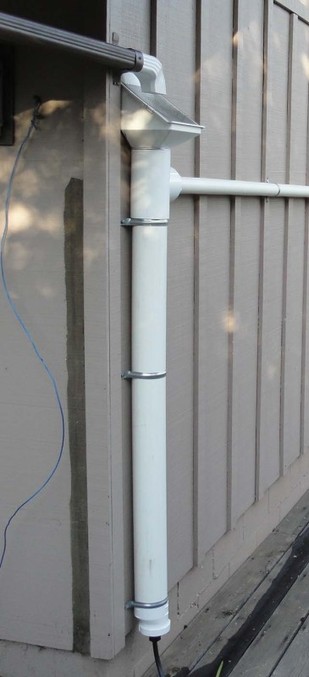
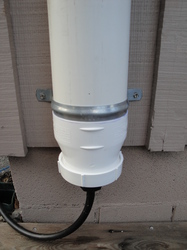
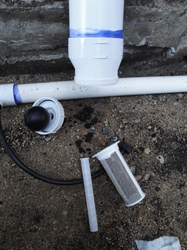
The First Flush is generally the next processing step for rainwater after the Leaf Eater. In this case the Leaf Eater sits on top of the First Flush and feeds water directly into it. The idea of the First Flush is to collect about 1 gallon per 100 square feet of catchment space and then remove that water from the system via an emitter at the bottom. When it rains the water hitting your roof will wash off debris. Some of this debris may be unseen like dead insects, or bird or other critter droppings, pollen, and other items that will be washed down the roof, and into the gutters. If the Leaf Eater screens don't catch these items, then they will flow to the First Flush. The First Flush will fill up with this "unwanted" water, and then divert the good water to the cistern. First Flush devices also have filters at the bottom of the device. The "black" dripper at the bottom can be screwed off and a long thin plastic filter will drop out. You can clean this by spraying it off with a high pressure hose. Your system may also have a larger screen, this is an extra option. By unscrewing the larger cap at the bottom, you will see debris that has been caught and you can also remove the larger screen if you have one installed. Clean it with a high pressure hose. Use the hose to wash out the bottom of the First Flush pipe. Shoot the water up there to make sure you clear all debris out of it. Then you are ready to reassemble. You will also notice a ball may have fallen out when you screwed off the larger cap. The ball floats to the top of the First Flush as the pipe fills. When it is full the ball seats at the top and causes further water from the Leaf Eater to be diverted into the Cistern. This is why it is important to size your First Flush correctly in order not to get debris into your Cistern. To reassemble, push the ball into the bottom of the pipe, next stick the larger filter up a half inch or so into the pipe. Next screw on the bottom cap for the pipe. You will notice the cap has a rubber gasket in the bottom of it. That will make sure it "seats" tightly and avoids leaks. Next push the long thin filter into the hole on the white cap. Then make sure your drip emitter is installed in the black cap on the inside. Once you have confirmed that, screw on the black emitter cap to the white bottom cap. You are done! Once you have done this a few times this should not take more than 5 minutes.
Additional Maintenance Note for the screw off cap at the bottom of a First Flush.
At the bottom of the First Flush mechanism are two caps. The small black one housing the smaller thinner filter and the larger white cap housing the optional larger filter. The small black cap screws off and on easily. However, if you have the optional filter and need to clean it regularly, you may find the larger white cap becomes very difficult to remove over time. The plastic cap threads bind against the plastic housing threads. To remedy this you can go to your local hardware store and buy a toilet bowl wax ring. The wax ring is used to avoid leakage around the bottom underside of the toilet. Well this wax also makes a good "lubricant" for the threads on the First Flush. With gloves on, I will scratch out some wax and wipe it onto the threads of the housing. I will apply it all the way around the housing. You will then notice when you screw on the cap it will turn and tighten much more easily. It will also help avoid any drips from this area of the First Flush if that was a problem. If you have the optional larger filter you will be cleaning it on a regular basis and therefore have to apply wax again in the future since it will wear off over time. I hope this hint helps you maintain your system.
What about Freezing Weather??
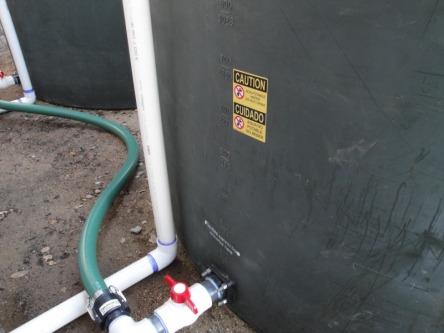
The preferred method of moving water from the gutters to the tanks is a "dry conveyance" system. This means when it rains the water is moving through the pipes and into the tanks. When it stops raining the pipes are dry. The pipes can't be damaged in freezing weather because there isn't any water in them. Where multiple tanks are involved connections between the tanks exist and have water in the pipes or hoses. In this picture you can see each tank is isolated by a ball valve. If it is going to freeze the ball valves can be closed and the pipes protected. The green flexible PVC hose connecting the tanks have Banjo quick connect/disconnect couplings and can be removed and replaced in seconds therefore making it easy for the homeowner to manage around weather requirements when necessary.
Pump Maintenance

Please read and follow the manufacturer's pump instructions carefully. We recommends the Grundfos MQ3-45 compression pump. This pump has a built in compression tank so doesn't require a separate one. It also comes ready to plug into a standard 110V wall plug. The pump only weighs about 27 pounds and is very portable. This pump will deliver approximately 65 psi.
To connect your pump-
1) Configure your RWH tank to the pump input. We recommends quick connect Banjo connectors with pressure hose. Next connect the pump output to a hose bib or other output system. Note the output pressure is rated at 65psi.
2) Before starting the pump you need to prime it per the instructions.
3) Unscrew the priming input port on top and fill with 1.2 gallons of water. Re-install the plug. Another way is to loosen the priming input port at the top and then open the valve from your tank. Gravity will feed water into your pump. Do this slowly. Once the pump is full, water will overflow from the priming input port. Screw it down tight and you are primed and ready.
4) Plug the pump into your 110V wall outlet. Note: Grundfos makes a 220v version, so make sure you know if your pump is 110v or 220v.
5) Open the ball valve from your tank to let the water flow to the pump.
6) To start the pump push the On/Off button on the pump electronics pad on top of the pump. (green light)
To disconnect the pump-
1) Make sure the on/off is in off position (red light)
2) Unplug the system from your wall plug.
3) Close the ball valve from your tank to the pump.
4) Open the hosebib on your outgoing line from the pump to release pressure in the system.
5) Unscrew the water outlet valve releasing the priming water and drain 1.2 gallons, then reinstall the plug.
6) Open the Banjo quick disconnect fittings on your flexible hoses and pull the connector and hose away from the pump releasing it.
7) There still may be some water in the outlet port. Turn your pump carefully on its side and let any additional water drain from the port.
It is a good idea to use your pump on a regular basis to keep all the mechanical parts in good working condition. Letting a pump sit for a long period of time without using it can sometimes cause problems. If you don't plan to use your pump for long periods of time we recommend draining it and storing it in a clean and dry environment.
If your pump is installed and the weather calls for freezing conditions, you should drain the pump and hoses and ideally move it into a protected area like a garage.
Grundfos recommends keeping the MQ3-45 covered. There is an electronic pad on top with the on/off switch. Water damage to the electronics has occured on occasion. If your pump has a pump cover make sure it is on and providing the desired protection.
Keeping your basket strainer clean!
If your system conveys water to a basket strainer instead of a Leaf Eater or other device, then it is important to remove debris from the basket strainer on a regular basis. This is especially true if your catchment area has trees or picks up debris from other sources on a regular basis. The basket strainer is the main filter of rainwater before entering your tank. It catches debris. Debris can breakdown organically in the basket strainer over time, or it can clog up the basket strainer and make it ineffective. Keeping it clean will help insure you have high quality rainwater entering your tank.
If your system conveys water to a basket strainer instead of a Leaf Eater or other device, then it is important to remove debris from the basket strainer on a regular basis. This is especially true if your catchment area has trees or picks up debris from other sources on a regular basis. The basket strainer is the main filter of rainwater before entering your tank. It catches debris. Debris can breakdown organically in the basket strainer over time, or it can clog up the basket strainer and make it ineffective. Keeping it clean will help insure you have high quality rainwater entering your tank.
Painting PVC Pipes to make them last
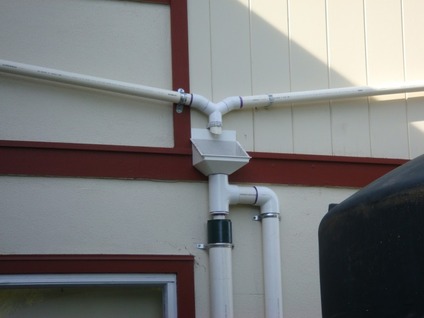
This picture shows unpainted PVC pipe after installation. PVC pipe can degrade over time in direct sunlight resulting in brittle pipes that can break or be damaged easily. Once your rainwater harvesting system is installed the PVC pipe should be painted. The first step is to clean the PVC pipe with a degreaser like TSP. TSP can be found in any hardware store. Next talk to the paint expert at your hardware store and get a primer that works on plastic. Lastly paint your PVC with water based paints. Painting the PVC will keep UV light from reaching the bare pipe and degrading it over time. In addition, it is not a bad idea to paint your tanks as well if they are in direct sunlight. Rainwater tanks are made with UV resistant materials in the plastic, however, painting them and keeping the raw plastic from UV light will extend the life of the tanks. Also note, there are excellent spray paints specifically for use on plastic typically located in your local hardware store. They work very well, come in an assortment of colors, and dry quickly. Again use TSP prior to spray painting.
After Painting the Leaf Eater and First Flush.
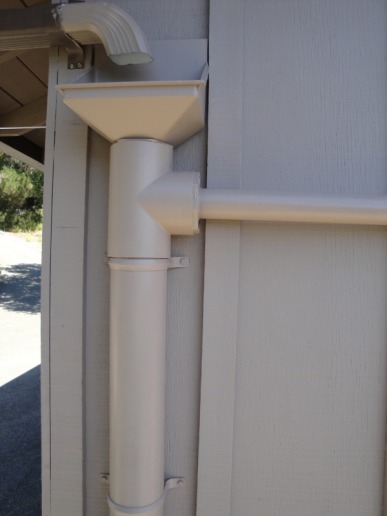
In this picture the home owner has painted the PVC pipe. It is now protected from damaging UV light that will break down the PVC over time and make it brittle and limit its life. Beyond the benefits of longevity it now blends in nicely with the home.
